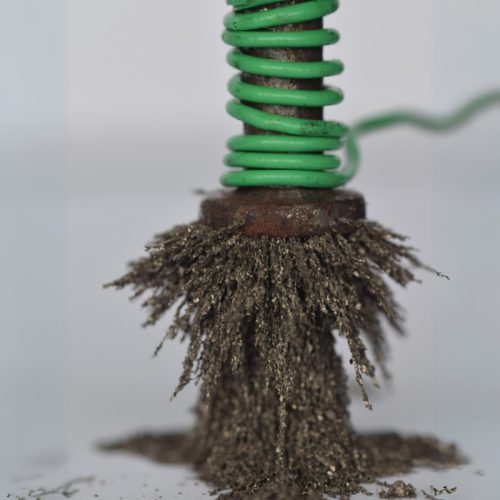
How to make an electromagnet:
A Step-by-Step Guide for Beginners
Embarking on a DIY electromagnet project is not just an educational journey—it’s a thrilling exploration into the world of physics.

Table of Contents
How to make an electromagnet:
A Step-by-Step Guide for Beginners
Embarking on a DIY electromagnet project is not just an educational journey—it’s a thrilling exploration into the world of physics, specifically the intriguing interaction between electricity and magnetism. This guide aims to demystify the process of creating an electromagnet at home, making it accessible for beginners and enthusiasts alike. By carefully following these steps, you’ll not only build your very own electromagnet but also deepen your understanding of electromagnetism’s principles. This project is perfect for those looking to engage with practical science or seeking a fun and productive activity.
Understanding Electromagnets: The Basics
An electromagnet is a type of magnet where the magnetic field is produced by an electric current. The beauty of electromagnets lies in their ability to turn on and off, offering a versatility that permanent magnets lack. The core of an electromagnet, typically made of iron, enhances the magnetic field generated by coils of wire through which an electric current flow. Adjusting the current’s strength or the coil’s number of turns can vary the magnetic field’s intensity.
Essential Materials for Your Electromagnet
To start this fascinating project, you’ll need the following items:
- Insulated copper wire (roughly 20-30 feet)
- A large iron nail or bolt (about 3-6 inches long)
- A D-cell battery
- Electrical tape or a battery holder for secure connections
- Wire strippers or scissors
A small metallic object (e.g., paper clip) for testing your electromagnet
Step-by-Step Guide to Building an Electromagnet
Step 1: Selecting Your Core
The iron nail or bolt you choose will serve as the electromagnet’s core, significantly influencing its strength. A larger core offers a more substantial area for the magnetic field to develop.
Step 2: Preparing the Wire
Strip approximately an inch of insulation from both ends of your copper wire using wire strippers or scissors. This exposes the metal, ensuring a good electrical connection.
Step 3: Wrapping the Coil
Wrap the insulated wire tightly around your iron core, starting from the head down to the tip, without overlapping the coils. The number of turns directly affects the magnet’s strength, so aim for as many coils as possible.
Step 4: Connecting to Power
Securely attach the stripped ends of the wire to the battery’s terminals using electrical tape or a battery holder. This step energizes your electromagnet.
Step 5: Testing Your Creation
Bring the end of your electromagnet near a small metal object. If everything is correctly set up, the object should be attracted to the electromagnet. Experiment with different coil numbers and observe the changes in magnetic strength.
Safety Tips for a Successful Project
While creating an electromagnet is a relatively safe activity, following these precautions ensures a smooth experience:
- Disconnect the battery when not in use to prevent wire overheating and battery drain.
- Check that the wire’s insulation is intact to avoid short circuits.
Always work in a well-ventilated area to reduce risks associated with battery leaks.
Conclusion: The Joy of Making an Electromagnet
Building your own electromagnet is more than just a DIY project; it’s a gateway to understanding the fascinating principles of electromagnetism. This hands-on experience not only enriches your knowledge but also sparks curiosity, paving the way for further scientific exploration and discovery. Remember, the key to a successful project lies in patience, precision, and safety. Happy experimenting!
Efficiently managing friction is crucial in technology and industry. Lubrication is a common method to reduce friction in machinery, extending the life of moving parts. In contrast, increasing friction can be beneficial, such as in tyre treads to improve grip on the road.
FAQ'S
1. What is an electromagnet?
An electromagnet is a type of magnet where the magnetic field is produced by an electric current. The beauty of electromagnets lies in their ability to turn on and off, offering a versatility that permanent magnets lack. The core of an electromagnet, typically made of iron, enhances the magnetic field generated by coils of wire through which an electric current flow.
2. How does an electromagnet work?
Electromagnets work by winding a wire into a coil around a core material, such as iron. When electric current flows through the wire, it generates a magnetic field around the coil, magnetizing the core and creating a powerful magnet.
3. Can the strength of an electromagnet be controlled?
Yes, the strength of an electromagnet can be controlled by adjusting the amount of electric current flowing through the coil or by changing the number of turns in the coil.
4. What are the main applications of electromagnets?
Electromagnets are used in a wide range of applications, including in electric motors, generators, MRI machines, maglev trains, and various industrial and consumer devices.
5. How can I make my own electromagnet?
To make your own electromagnet, you need a core material (such as an iron nail), insulated copper wire, a battery, and some basic tools. Wrap the wire tightly around the core, connect the ends of the wire to the battery, and your electromagnet is ready.
6. What safety precautions should I take when working with electromagnets?
When working with electromagnets, it’s important to use low-voltage power sources to minimize the risk of electric shock. Always ensure the wire is properly insulated and be cautious with the core material, as it can become very hot.
